| | It's stripping time! |  |
|
+26Skytiger Voyager osg buzzinfinity gordonmac Bumble olive Matt harryhornet Daz stoneyuk jme Batman Kev michel_bonn Sunny dizzylizard Tallulah TimV MarcusH thesplitsombrero kiteman AbsintheKombi pastymaster irishman absquatulation 30 posters |
|
| Author | Message |
|---|
Bumble

Cabin : Exec 049
Location : Hampshire
Posts : 1473
Join date : 2014-09-03
 |  Subject: Re: It's stripping time! Subject: Re: It's stripping time!  Mon Mar 16, 2015 4:56 pm Mon Mar 16, 2015 4:56 pm | |
| Looks great and so much better than the Danbury sticker (warped in our case!) What sort of cost is a late bay speedo? How much to recalibrate with Speedycables? I'd just like to be able to know how fast we're going and be able to see the speedo in the dark, nothing important really!  | |
|
  | |
Skytiger

Cabin : Exec 008
Location : Central Scotland
Posts : 1792
Join date : 2010-09-04
 |  Subject: Re: It's stripping time! Subject: Re: It's stripping time!  Mon Mar 16, 2015 6:45 pm Mon Mar 16, 2015 6:45 pm | |
| The cost to re-calibrate is about £80 but turnaround time is six weeks, so some forward thinking is required and it's what ever you can get a late bay speedo for mine came from ebay. The mountings for each speedo are not compatible, but I managed to use a bit of foam to jam the late bay speedo into my dash so I can still use my bus. | |
|
  | |
dizzylizard

Cabin : Exec 018
Location : Bradford-on-Avon, Wilts and Bristol
Posts : 2241
Join date : 2011-09-20
 |  Subject: Re: It's stripping time! Subject: Re: It's stripping time!  Mon Mar 16, 2015 8:07 pm Mon Mar 16, 2015 8:07 pm | |
| Nice job ST  | |
|
  | |
Skytiger

Cabin : Exec 008
Location : Central Scotland
Posts : 1792
Join date : 2010-09-04
 |  Subject: Re: It's stripping time! Subject: Re: It's stripping time!  Wed Mar 25, 2015 8:38 pm Wed Mar 25, 2015 8:38 pm | |
| Some progress on the sump guard...... This is the rear bracket for my sump guard it is using the original brake arm mount  This is it from the front  This is the plate that is fitted to the original left hand drive steering box mount on the chassis leg.  The white plates(one still needs to be bent)will be welded to the steering box mount plate, then the black crash beam(sump guard) will be bolted to them. 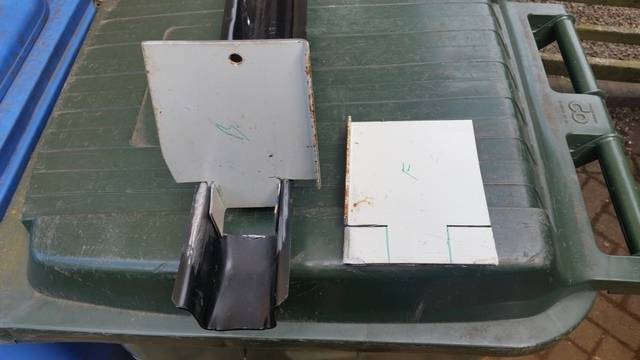 | |
|
  | |
Skytiger

Cabin : Exec 008
Location : Central Scotland
Posts : 1792
Join date : 2010-09-04
 |  Subject: Re: It's stripping time! Subject: Re: It's stripping time!  Thu Mar 26, 2015 5:17 pm Thu Mar 26, 2015 5:17 pm | |
| This is a side view, still got to weld on the plates but gives you an idea. I think I'll make it a bit shorter.  | |
|
  | |
dazdub

Cabin : Exec 012
Location : wales
Posts : 3118
Join date : 2009-10-16
 |  Subject: Re: It's stripping time! Subject: Re: It's stripping time!  Thu Mar 26, 2015 5:45 pm Thu Mar 26, 2015 5:45 pm | |
| Very nice  | |
|
  | |
michel_bonn

Cabin : Club
Location : Germany, near Cologne- Bonn
Posts : 946
Join date : 2011-08-31
 |  Subject: Re: It's stripping time! Subject: Re: It's stripping time!  Fri Mar 27, 2015 6:29 am Fri Mar 27, 2015 6:29 am | |
| very good, good idea. i think it is a projekt for me, not the same, but a idea for me. :-))))
do you often take a offroad tour? haha
but on the photo i see you inside tyre. it is soooo clean. do you clean the inside of it every day? at my car the are black! :-)
i love your car!!!
________________________________________________________________________________
http://www.t2-c.de
| |
|
  | |
Skytiger

Cabin : Exec 008
Location : Central Scotland
Posts : 1792
Join date : 2010-09-04
 |  Subject: Re: It's stripping time! Subject: Re: It's stripping time!  Fri Mar 27, 2015 8:15 pm Fri Mar 27, 2015 8:15 pm | |
| You have to clean the inside aswell as it would annoy me if they are dirty. Not everyday but everytime I wash the bus. | |
|
  | |
Skytiger

Cabin : Exec 008
Location : Central Scotland
Posts : 1792
Join date : 2010-09-04
 |  Subject: Re: It's stripping time! Subject: Re: It's stripping time!  Sat Mar 28, 2015 9:30 pm Sat Mar 28, 2015 9:30 pm | |
| This is my bracket which bolts to the steering box mount just tacked in place to check fitment. 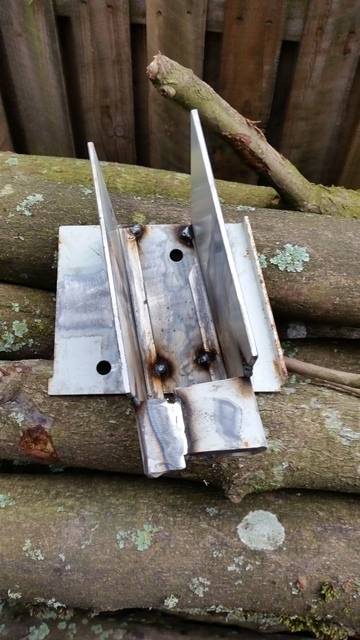  Will add some gussets and fully weld tomorrow. | |
|
  | |
Skytiger

Cabin : Exec 008
Location : Central Scotland
Posts : 1792
Join date : 2010-09-04
 |  Subject: Re: It's stripping time! Subject: Re: It's stripping time!  Sun Apr 05, 2015 11:30 pm Sun Apr 05, 2015 11:30 pm | |
| Well sump guard is finished, pics to follow. The task for today was engine removal for clutch and alternator replacement. Jacked up and on axle stands.  First was air box removal now you see it!  Now you don't, I put a plastic bag over the inlet to stop anything getting down there  Fuel filter bracket removed ready to disconnect pipes 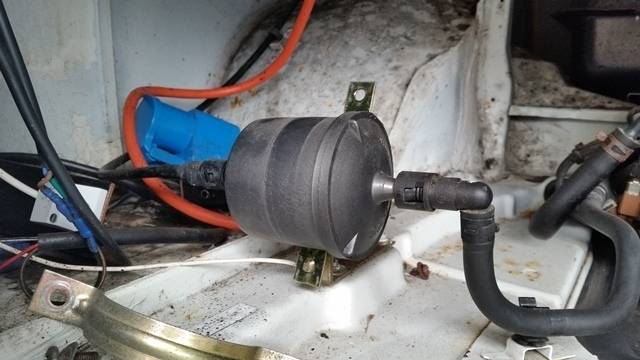 A container for the fuel which comes out the filter 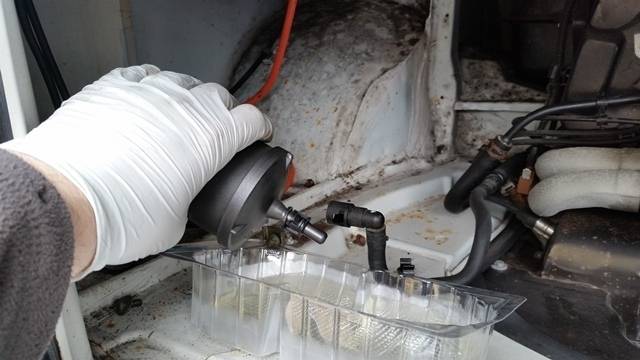 I had removed the back panel first before the bumper and towbar, because there where two captivated nuts which just spun in the chassis when trying to remove the bolts. These had to get cut off in order to remove said bumper and towbar no pics as I was a little annoyed to say the least(more to fix for refitting)  to be continued...... | |
|
  | |
Skytiger

Cabin : Exec 008
Location : Central Scotland
Posts : 1792
Join date : 2010-09-04
 |  Subject: Re: It's stripping time! Subject: Re: It's stripping time!  Sun Apr 05, 2015 11:54 pm Sun Apr 05, 2015 11:54 pm | |
| ........later There where various electrical connections next, Lambda   Ignition coil  Throttle position sensor and something else  Distributor   Injector wiring 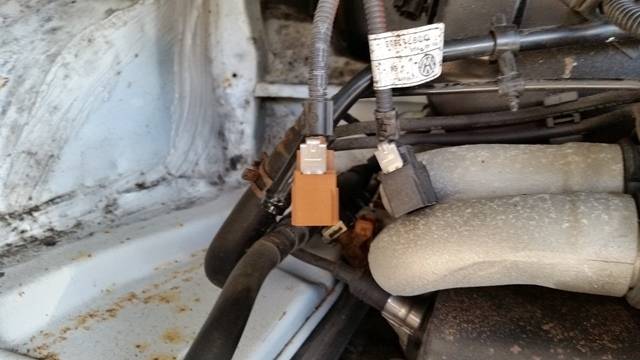  Accelerator cable 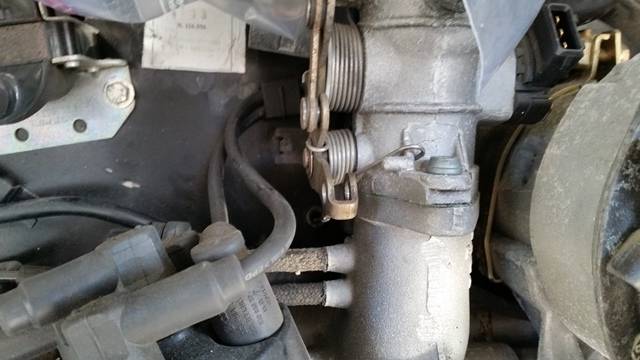 After everything was disconnected, we did forget a breather pipe to the canister underneath so remember that one folks. It was just a matter of removing the 1 bolt and 3 nuts to relieve the engine from the gearbox. There is one nut behind the fan shroud on the offside within the engine bay(thanks dad for finding that  ) Canister which breather pipe needs removing(added pic now)  Dad helped with removal, easy does it guys take it slow.  Nearly there carefull  Made it, relax, now it's out. 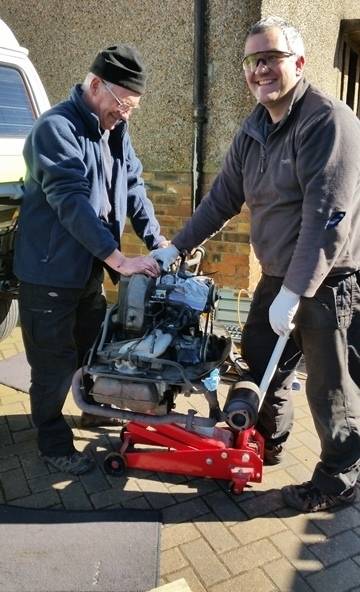 It was coffee time after that, before clutch replacement coming soon.....
Last edited by Skytiger on Tue Apr 07, 2015 11:38 pm; edited 2 times in total (Reason for editing : Adding more pics) | |
|
  | |
michel_bonn

Cabin : Club
Location : Germany, near Cologne- Bonn
Posts : 946
Join date : 2011-08-31
 |  Subject: Re: It's stripping time! Subject: Re: It's stripping time!  Mon Apr 06, 2015 5:33 am Mon Apr 06, 2015 5:33 am | |
| hey sky, very good information, that is very very good, thank you a lot
________________________________________________________________________________
http://www.t2-c.de
| |
|
  | |
Skytiger

Cabin : Exec 008
Location : Central Scotland
Posts : 1792
Join date : 2010-09-04
 |  Subject: Re: It's stripping time! Subject: Re: It's stripping time!  Mon Apr 06, 2015 8:09 am Mon Apr 06, 2015 8:09 am | |
| .....Clutch removed, it looks like the clutch was getting fairly hot!  Flywheel, a little heat discolouration. Locking tool in place in order to remove the pressure plate bolts.  Remember to put some grease which is supplied with the new clutch on this roller bearing when refitting.  Old clutch release bearing, the one I took off had an extra bit sticking out the back which my replacement doesn't have. This may not have allowed full clamping force onto the flywheel a possible reason for slipping on steep inclines.  Bearing removed just a spring clip either side, a little grease on the splines and the cone which the release bearing slides on helps keep everything moving.  New clutch and pressure plate being installed with clutch aligning tool and flywheel locking tool holding flywheel still, keep checking as you tighten the bolts on the pressure plate that the clutch tool slips in and out easily.(You did lube the roller bearing?) 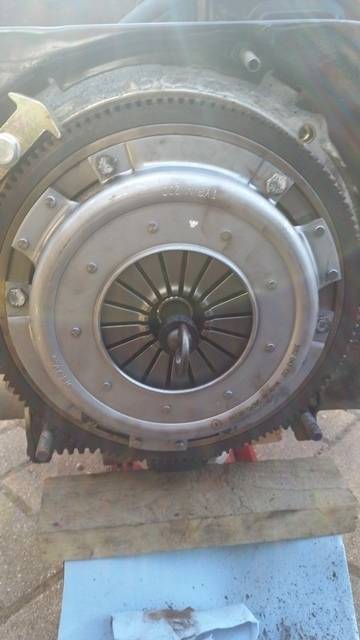 Alternator next..... | |
|
  | |
Skytiger

Cabin : Exec 008
Location : Central Scotland
Posts : 1792
Join date : 2010-09-04
 |  Subject: Re: It's stripping time! Subject: Re: It's stripping time!  Tue Apr 07, 2015 10:56 pm Tue Apr 07, 2015 10:56 pm | |
| Here I go, first thing get fan belt off, undo nut  Nut off take one side of pulley off.  and remove belt  Top 10mm bolts easy access   Bottom two another story, you can just make them out   But I read Buzzinfinity's instructions, loosened the intake pedestal to get enough room to get a spanner on the bottom bolts but could I get my spanner in to turn it, not sure if it was the shape and size of my spanner and I could go to the other side of the engine and try but no luck so decided on a different tactic. Loosen the two bolts either side of the fan shroud   I then removed the alternator bracket and lifted the fan shroud with alternator attached in one lump up and out. This is the way when the engine is out, so I once again salute you Buzz for doing it with engine in.  and its out  I then took the fan off the alternator 36mm nut holding the fan belt side with a big adjustable and this is the order it came off, alternator is positioned from the left. Spacer, two shims, fan, shim, spring lock washer 36mm nut.  You then need a puller to get the fan side mount off the shaft.  There is a little keyway on the shaft.  The fan side just needed a little tap and it came off ok, you can see the flats I held with the adjustable spanner in order to get the fan nut off.  Ready for reassembly new one on left hand side.  As Buzzinfinity said I'm using the original spacers in the same order they came off so the fan won't hit the shroud. | |
|
  | |
Skytiger

Cabin : Exec 008
Location : Central Scotland
Posts : 1792
Join date : 2010-09-04
 |  Subject: Re: It's stripping time! Subject: Re: It's stripping time!  Tue Apr 07, 2015 11:13 pm Tue Apr 07, 2015 11:13 pm | |
| I thought I would take the opportunity to adjust my tappets when the engine is out to aid access. Took nearside off and found this inside, a rocker shaft spring washer!!!   Thanks Ronnie Ringding for finding the stockists for these parts, they were quickly ordered this morning, will eventually get this engine back in sometime this year!!! So I thought I would use this down time to repaint my rocker covers. One half cleaned up with the wire wheel.  The rods needed cleaned up as well  A bit of grey primer  A bit of gloss black  Hey presto black rocker covers  | |
|
  | |
Skytiger

Cabin : Exec 008
Location : Central Scotland
Posts : 1792
Join date : 2010-09-04
 |  Subject: Re: It's stripping time! Subject: Re: It's stripping time!  Tue Apr 07, 2015 11:27 pm Tue Apr 07, 2015 11:27 pm | |
| The last time I changed my sparkplugs it was a bit of a pain getting the sparkplug socket onto the plug straight as the tin ware was stopping it. So I decided to take the tin ware off to enlarge the holes in the right places to make it really easy to change them in the future.   I had to remove however the inlet manifolds to take the tin ware off and then the gaskets decided to fall apart when doing so, but luckily Euro Car Parts could get the gaskets for tomorrow. | |
|
  | |
Skytiger

Cabin : Exec 008
Location : Central Scotland
Posts : 1792
Join date : 2010-09-04
 |  Subject: Re: It's stripping time! Subject: Re: It's stripping time!  Tue Apr 07, 2015 11:35 pm Tue Apr 07, 2015 11:35 pm | |
| Oh forgot to mention when taking some of my exhaust off in preparation for engine removal, I noticed the welds to the silencer's had broken, luckily it has a lifetime warranty so once Phileas is back together I will need to take it back for fixing.   Exhaust now re-welded and supports added for strength Stainless Creations managed to weld it off the bus, first class service from them.  
Last edited by Skytiger on Fri Apr 10, 2015 8:45 pm; edited 1 time in total (Reason for editing : Added pictures of exhaust fixed) | |
|
  | |
gordonmac

Cabin : Exec 029
Location : Glasgow
Posts : 426
Join date : 2013-03-19
 |  Subject: Re: It's stripping time! Subject: Re: It's stripping time!  Wed Apr 08, 2015 7:30 am Wed Apr 08, 2015 7:30 am | |
| You really have no fear! I wouldn't dare do any of that incase I couldn't get it back together!! | |
|
  | |
dazdub

Cabin : Exec 012
Location : wales
Posts : 3118
Join date : 2009-10-16
 |  Subject: Re: It's stripping time! Subject: Re: It's stripping time!  Wed Apr 08, 2015 8:15 am Wed Apr 08, 2015 8:15 am | |
| Top job as usual  | |
|
  | |
AbsintheKombi

Cabin : Exec 013
Location : Leyland, Lancs
Posts : 5654
Join date : 2011-07-25
 |  Subject: Re: It's stripping time! Subject: Re: It's stripping time!  Wed Apr 08, 2015 9:11 am Wed Apr 08, 2015 9:11 am | |
| All hail, Skytiger - I'm in awe of your skills. 
________________________________________________________________________________
Absinthe makes the heart grow fonder
Blog: C13MPR
Finalist in the Caravan Club Caravanner of the Year Competition 2016
Star Kombi Winner 2015
| |
|
  | |
harryhornet

Cabin : Exec 027
Location : Fair Oak, Hampshire
Posts : 2849
Join date : 2012-04-19
 |  Subject: Re: It's stripping time! Subject: Re: It's stripping time!  Wed Apr 08, 2015 10:36 am Wed Apr 08, 2015 10:36 am | |
| Scotland's answer to Edd China.  | |
|
  | |
Skytiger

Cabin : Exec 008
Location : Central Scotland
Posts : 1792
Join date : 2010-09-04
 |  Subject: Re: It's stripping time! Subject: Re: It's stripping time!  Thu Apr 09, 2015 8:13 pm Thu Apr 09, 2015 8:13 pm | |
| Thank folks  Well my rocker shaft spring washers arrived yesterday great service from Machine7, just got round to fitting today. Started to pull everything off the shaft in order to replace it.  The rocker shaft mounting block split in two.  Quickly on to ordering new ones from VWHeritage will be here tomorrow. I am going to replace all four mounting blocks and all eight spring washers just to be on the safe side. | |
|
  | |
Skytiger

Cabin : Exec 008
Location : Central Scotland
Posts : 1792
Join date : 2010-09-04
 |  Subject: Re: It's stripping time! Subject: Re: It's stripping time!  Thu Apr 09, 2015 8:28 pm Thu Apr 09, 2015 8:28 pm | |
| Back to alternator managed to build it back up ready for installing into the shroud. Bolted the two sides of the tin ware together plus there is a little spacer in the middle then two bolts hold it onto the back of the alternator.  A little painting I couldn't help myself, just to spruce it up   Then it was on with the fan using the spacers and shims as they came off(Top tip Buzzinfinity) and then tightening the 36mm nut.  All done ready to go into the shroud.  I couldn't get the bolts to line up in the shroud, then I noticed the two halves of the alternator tin ware were not lined up. So back off with the fan, loosen the bolts straighten the two halves this time I put a nut and bolt in one hole to keep it aligned while I tightened the alternator bolts.  Problem solved went straight in then. | |
|
  | |
Skytiger

Cabin : Exec 008
Location : Central Scotland
Posts : 1792
Join date : 2010-09-04
 |  Subject: Re: It's stripping time! Subject: Re: It's stripping time!  Thu Apr 09, 2015 8:38 pm Thu Apr 09, 2015 8:38 pm | |
| Update on sump guard All welding finished ready for paint Skid plate rear  Skid plate front  Front mounting bracket with towing eye thread at the front    This is the rear mounting bracket.  Will show finished pics once paint is dry | |
|
  | |
Skytiger

Cabin : Exec 008
Location : Central Scotland
Posts : 1792
Join date : 2010-09-04
 |  Subject: Re: It's stripping time! Subject: Re: It's stripping time!  Thu Apr 09, 2015 8:45 pm Thu Apr 09, 2015 8:45 pm | |
| This is all the tin ware drying literally on the washing line, nice bit of gloss black.  I then brought it inside the garage overnight  Yes it's hanging on my rear bumper 
Last edited by Skytiger on Fri Apr 10, 2015 12:01 pm; edited 1 time in total | |
|
  | |
Sponsored content
 |  Subject: Re: It's stripping time! Subject: Re: It's stripping time!  | |
| |
|
  | |
| | It's stripping time! |  |
|

