| | It's stripping time! |  |
|
+26Skytiger Voyager osg buzzinfinity gordonmac Bumble olive Matt harryhornet Daz stoneyuk jme Batman Kev michel_bonn Sunny dizzylizard Tallulah TimV MarcusH thesplitsombrero kiteman AbsintheKombi pastymaster irishman absquatulation 30 posters |
|
| Author | Message |
|---|
Guest
Guest
| | Subject: Re: It's stripping time! Mon Jul 23, 2012 10:07 pm | |
| how much for LILYVDUB ?????????????? everyone has a price!!!!! |
|
| | |
Guest
Guest
| | Subject: Re: It's stripping time! Mon Jul 23, 2012 10:09 pm | |
| how long did it take to remove the danbury sign and is the lettering just stuck to the pop top |
|
| | |
Skytiger

Cabin : Exec 008
Location : Central Scotland
Posts : 1792
Join date : 2010-09-04
| | Subject: Re: It's stripping time! Mon Jul 23, 2012 10:44 pm | |
| The lettering is part of the mould for the pop-top so it is just gelcoat you are sanding away, I used an angle grinder first with a flap disc which isn't shown in the photos but you need to be real careful it is really severe(Time issues made me use it, Sleepover 2012 and all that) to take majority of it off then an orbital sander and a detail sander which was the safest as it small and controllable. Time wise probably an hour cover your bus as much as possible the dust goes everywhere and wear a mask and eye protection gelcoat dust is nasty stuff. However the dust can just be removed by a hose afterwards. I also reduced the amount of dust going onto the pop-top by strapping the rear down a bit so it didn't go all the way up and to be able to reach the lettering to sand off. The letters were £1 each from ebay the Silicone Mould Resin kit was £56 but you use half of it, the primer and paint are £13, the 90sec epoxy glue to stick it on with is £8.50, the perspex I had so no cost the cutlery tray a pound but can be reused so for LILYVDUB about £57.50 in parts alone. Not to mention Skytigers hourly rate  Don't think it's going to be a big seller  | |
|
| | |
Guest
Guest
| | Subject: Re: It's stripping time! Mon Jul 23, 2012 11:02 pm | |
| cheers for that , lol , you never quoted your rate!!!!! if only you lived closer!brilliant job though, very individual get it patented , quick. |
|
| | |
Skytiger
Cabin : Exec 008
Location : Central Scotland
Posts : 1792
Join date : 2010-09-04
| | Subject: Re: It's stripping time! Mon Aug 20, 2012 10:44 pm | |
|
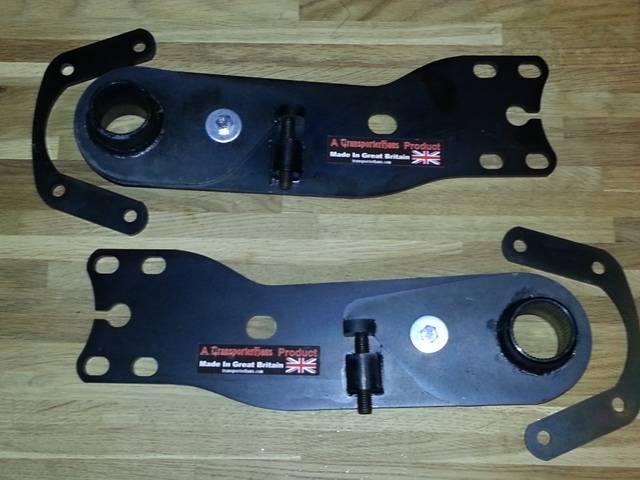
Let the lowering begin!!! I am just waiting for my dropped spindles and rear adjustable plates to be made and delivered and I'll do a complete "how to" when they arrive, not sure on timescale yet but maybe ready for the Northern Chapter meet.
| |
|
| | |
dazdub

Cabin : Exec 012
Location : wales
Posts : 3117
Join date : 2009-10-16
| | Subject: Re: It's stripping time! Tue Aug 21, 2012 8:03 am | |
| Sweeeeeet will look cool  | |
|
| | |
Scooby
Cabin : Flight 004
Location : Reading
Posts : 8831
Join date : 2010-12-12
| |
| | |
Skytiger
Cabin : Exec 008
Location : Central Scotland
Posts : 1792
Join date : 2010-09-04
| | Subject: Re: It's stripping time! Sun Sep 09, 2012 11:13 pm | |
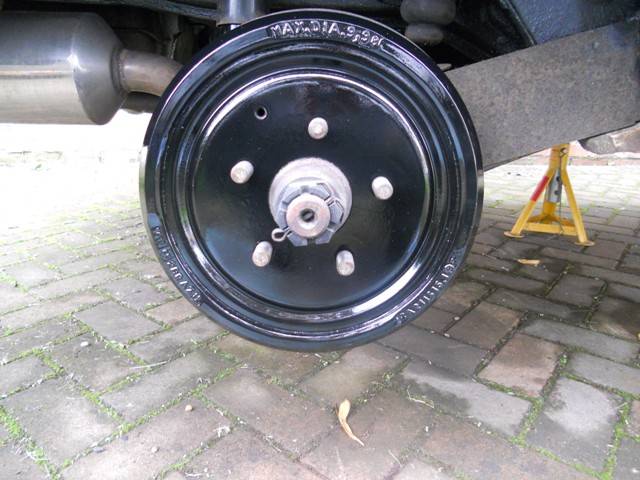
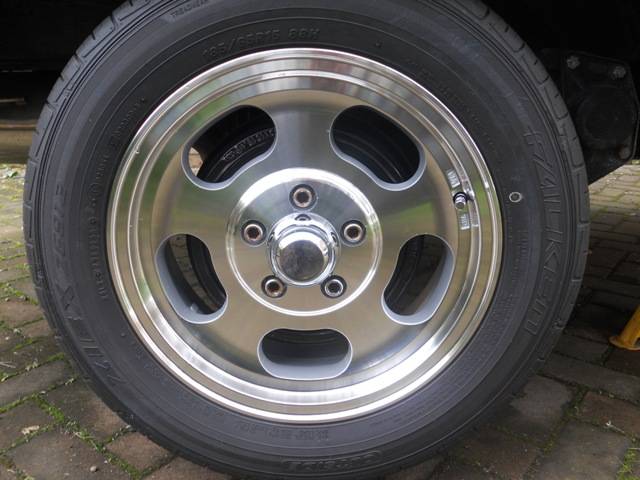
| This is my new toy, I was testing it today as I wanted to clean out my front brakes ready for MOT this week. 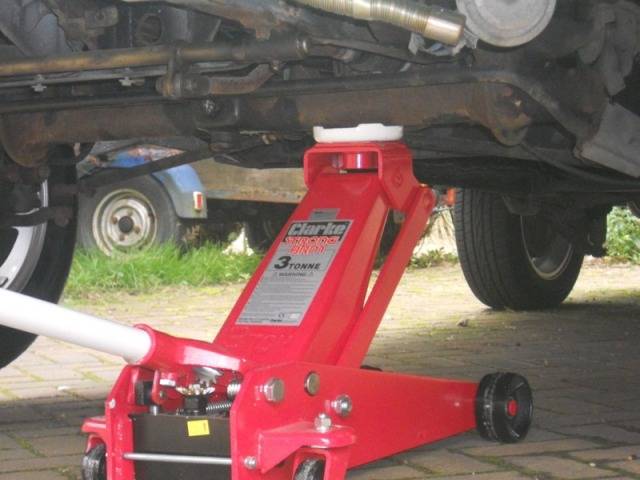  I also wanted to take my drums off for a clean and adjustment for MOT and thought now would be the time to paint them because you can see them through my alloys. Before   Painted photos will need to be tommorow it started raining so got them inside to dry. | |
|
| | |
Matt

Cabin : Club
Location : Eastleigh
Posts : 883
Join date : 2010-03-28
| | Subject: Re: It's stripping time! Mon Sep 10, 2012 8:39 am | |
| congratulations, you appear to be the first person to raise your van rather than have it lowered. ________________________________________________________________________________ Matt. | |
|
| | |
Skytiger
Cabin : Exec 008
Location : Central Scotland
Posts : 1792
Join date : 2010-09-04
| | Subject: Re: It's stripping time! Mon Sep 10, 2012 6:57 pm | |
| | |
|
| | |
Skytiger
Cabin : Exec 008
Location : Central Scotland
Posts : 1792
Join date : 2010-09-04
| | Subject: Re: It's stripping time! Fri Jan 04, 2013 11:55 pm | |
| | |
|
| | |
TimV
Admin

Cabin : Flight 001
Location : Brighton, East Sussex U.K.
Posts : 14338
Join date : 2009-09-27
| | Subject: Re: It's stripping time! Sat Jan 05, 2013 12:13 am | |
| Good luck! Hope the weather doesn't impinge on your project! ________________________________________________________________________________ Max SportsKombi - The Bay Racer 
@brazilianvwbay | |
|
| | |
Skytiger
Cabin : Exec 008
Location : Central Scotland
Posts : 1792
Join date : 2010-09-04
| | Subject: Re: It's stripping time! Sat Jan 05, 2013 5:57 pm | |
| The weather was like summer 10 degrees and no rain  Ok safety first use a good jack and axle stands you have been warned 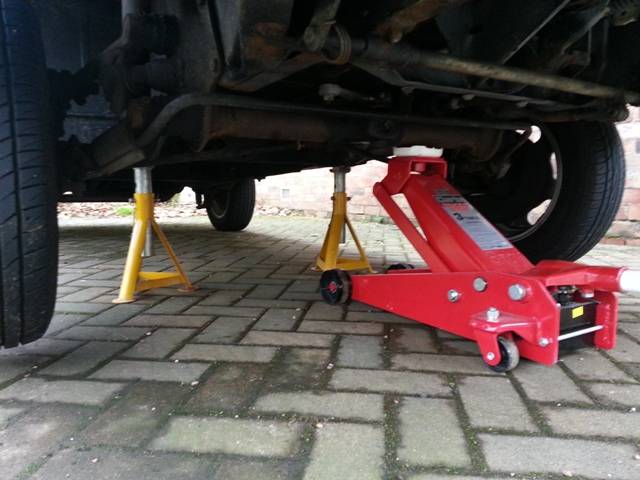 Ok with wheel off this is what's left 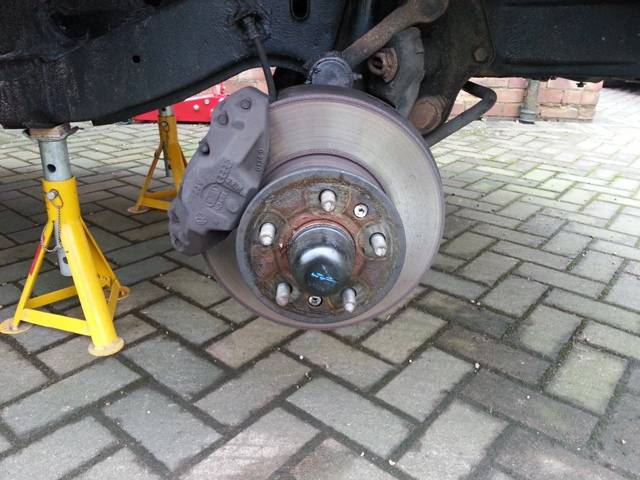 First off is the two 19mm bolts holding on the brake caliper circled in red  The bolts are different types as shown below  Cable tie the caliper out of the way so it doesn't put a strain on the brake hose 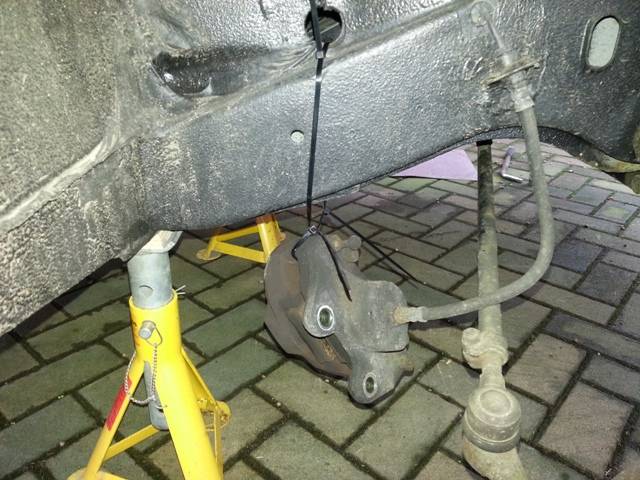 Next is removing the hup cap you will need to use a pry bar it's on tight move around the cap levering as you go. 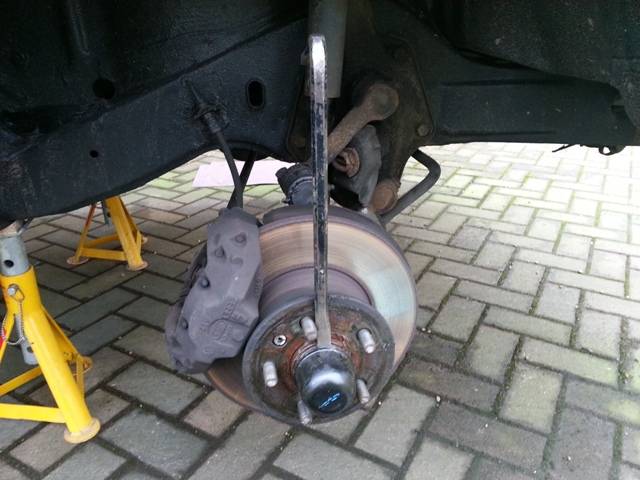 Removing the two 6mm allen bolts to remove the brake disc, I had my pry bar between the studs to stop the disc moving but they weren't tight.  Lever the locking tabs up with a screwdriver 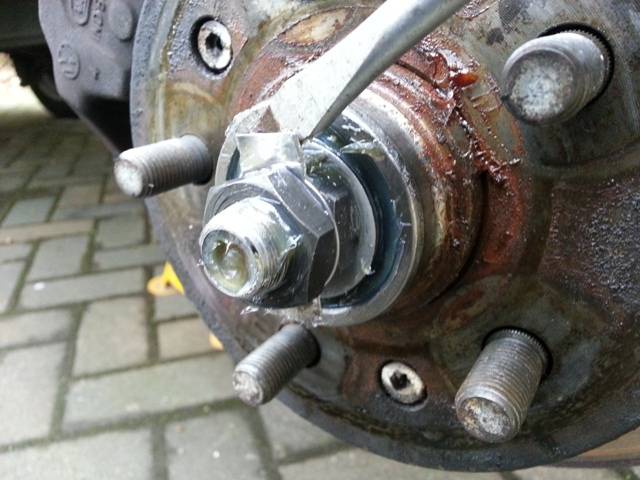 I used a 27mm spanner on the inside nut and a 27mm deep socket on the outside one. You are trying to unlock them from each other.  Nuts, lock washer and washer removed 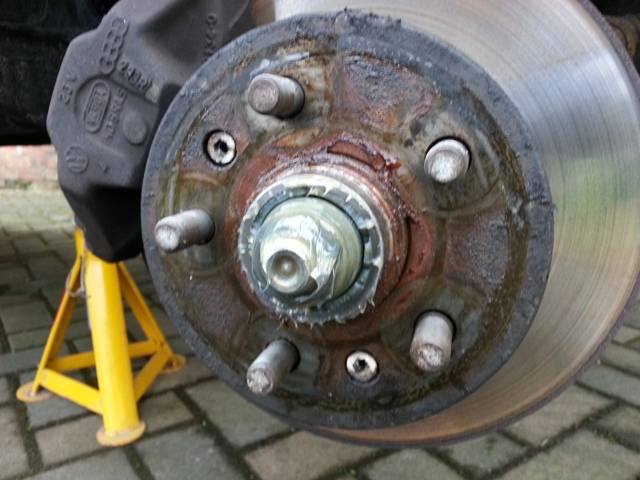 How the nuts and washers are positioned on the axle  This is a picture of the hub with brake caliper and disc removed.  You can now pull the hub off the axle and you will be left with this. 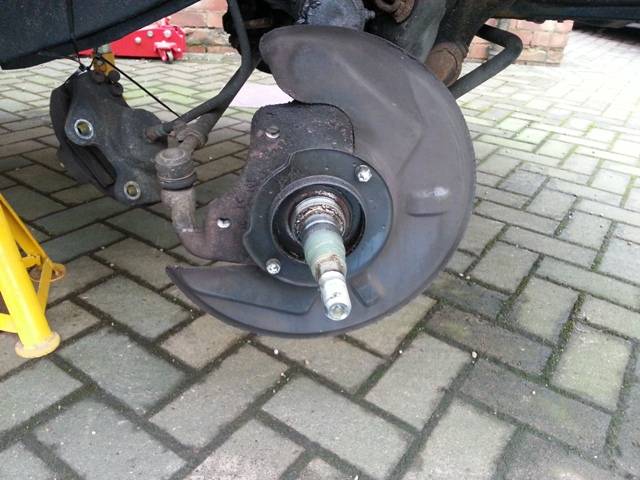 Remove the two 11mm bolts holding on the backing plate I removed the 19mm nut holding on the track rod and used a removal tool in order to remove it from the spindle. 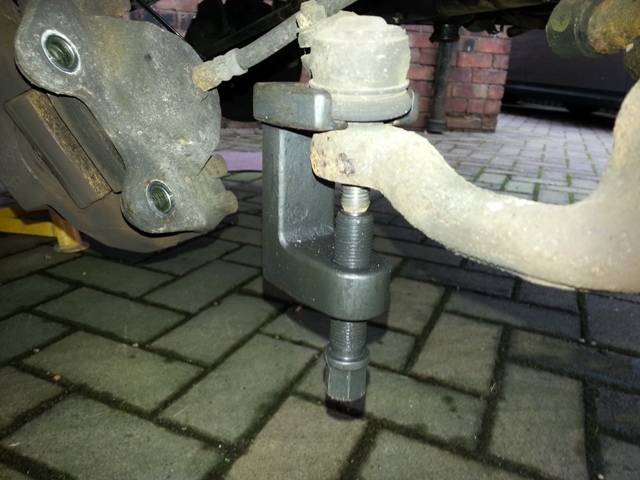 This is the spindle free from the track rod 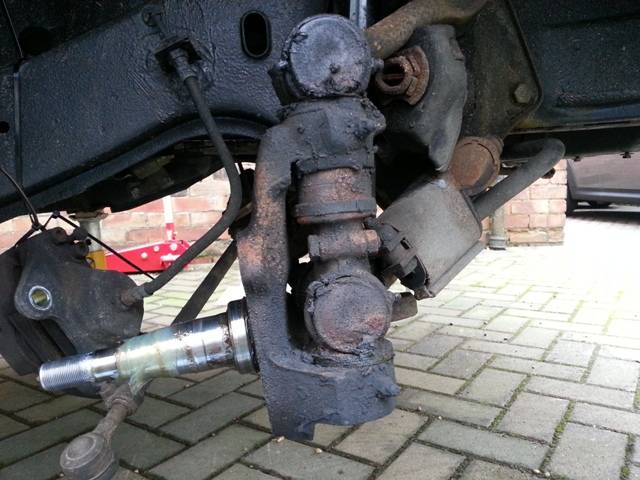 Undo the two 17mm nut and bolts (circled in red) that are holding the link pins onto the trailing arms and take out both link pins.  The bottom one which has the spanner on it has a split pin that needs to be removed first.  This is with the bottom link pin removed I had to use a hammer to get them to move, I cleaned up the outer portion with some sand paper on the top one as it was difficult to remove.  The spindle removed from the trailing arms. 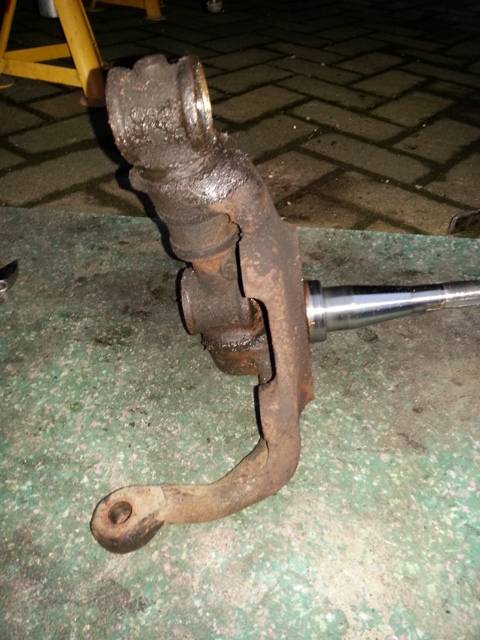  This is the old and new side by side.  This was me for the day, drivers side removed passenger side will be tommorows task. Then I need to remove the link pin race from the old spindle and press them into the new ones. Not sure how I'm going to do this yet as I don't have a press. Oh and I think I'm going to remove my beam to give it a lick of paint and to finish my stone chip shielding at the front, am I mad or what 
Last edited by Skytiger on Sun Jan 06, 2013 5:59 pm; edited 1 time in total (Reason for editing : Missed out a picture of hub) | |
|
| | |
TimV
Admin
Cabin : Flight 001
Location : Brighton, East Sussex U.K.
Posts : 14338
Join date : 2009-09-27
| | Subject: Re: It's stripping time! Sat Jan 05, 2013 6:40 pm | |
| Extremely dedicated is how I'd describe you mate! ________________________________________________________________________________ Max SportsKombi - The Bay Racer
@brazilianvwbay | |
|
| | |
Skytiger
Cabin : Exec 008
Location : Central Scotland
Posts : 1792
Join date : 2010-09-04
| | Subject: Re: It's stripping time! Sun Jan 06, 2013 5:54 pm | |
| Well removed the left side today much quicker as I know what i'm doing now. This is the speedo cable going into the back of the left hand spindle. 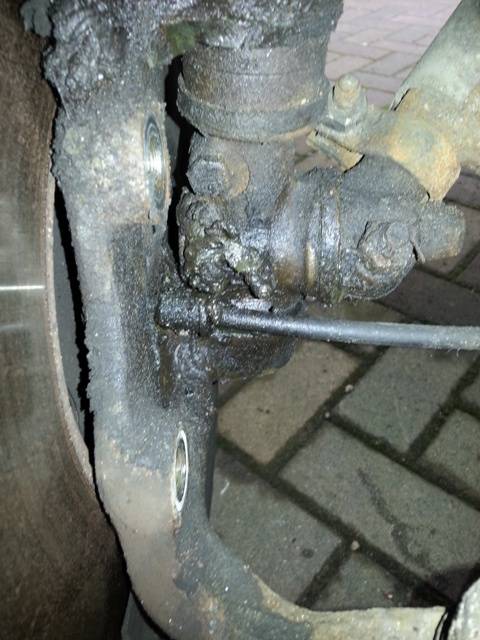 Left side has the speedo cable so the split pin needs to be removed in the cap before you can remove it from the spindle. 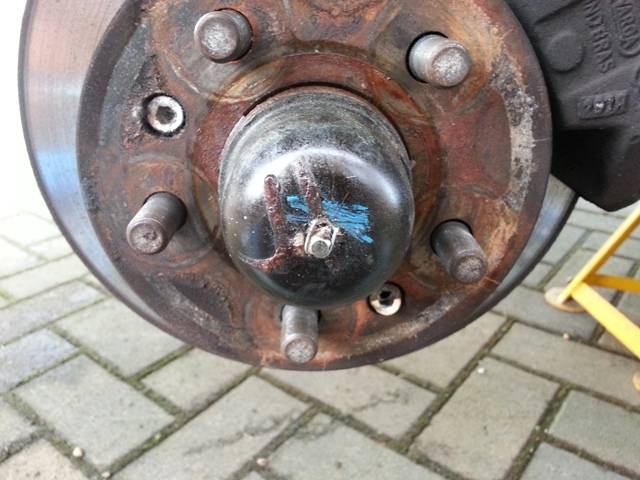 Speedo cable removed. 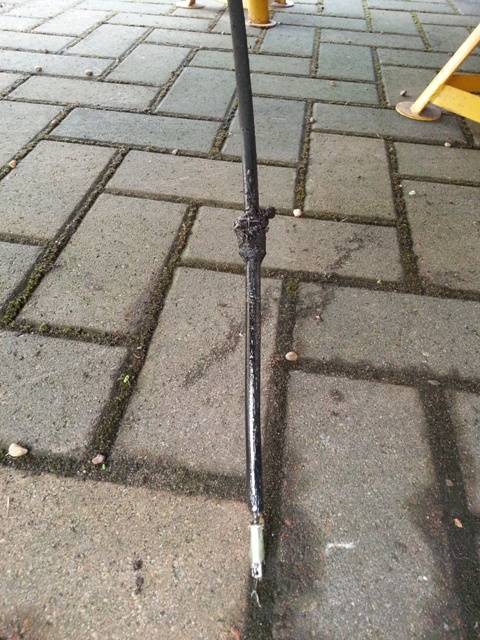 Then from here it's just a matter of doing exactly the same as the other side. (I did note however there was split pins in both bolts holding the link pins into the trailing arms on this side.) | |
|
| | |
TimV
Admin
Cabin : Flight 001
Location : Brighton, East Sussex U.K.
Posts : 14338
Join date : 2009-09-27
| | Subject: Re: It's stripping time! Sun Jan 06, 2013 6:11 pm | |
| It's almost worth fitting a bike speedo while you're doing all this - you'd probably get a more accurate mph reading! ________________________________________________________________________________ Max SportsKombi - The Bay Racer
@brazilianvwbay | |
|
| | |
Skytiger
Cabin : Exec 008
Location : Central Scotland
Posts : 1792
Join date : 2010-09-04
| | Subject: Re: It's stripping time! Sun Jan 06, 2013 8:50 pm | |
| Also came up with a solution to not having a press, using various size sockets I managed to press the link pin races out with my vice. My dad's help with this was much appreciated you need someone to support the weight of the spindle and help position it at the same time while I wound the vice in and out. Here is me fitting one race into the new dropped spindle 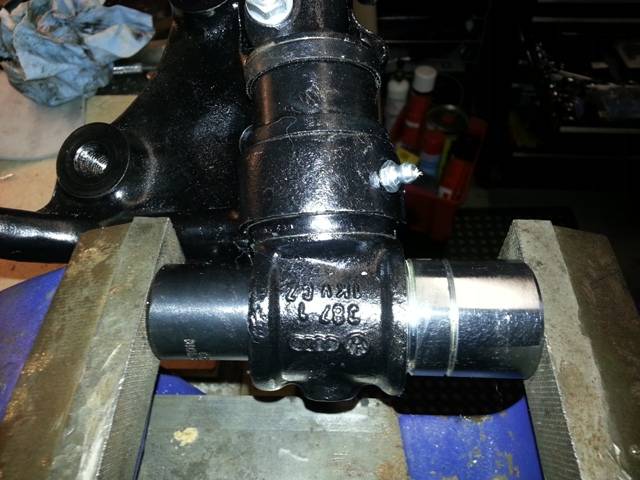 | |
|
| | |
TimV
Admin
Cabin : Flight 001
Location : Brighton, East Sussex U.K.
Posts : 14338
Join date : 2009-09-27
| | Subject: Re: It's stripping time! Sun Jan 06, 2013 9:15 pm | |
| Perfect opportunity to sink some luverly thick out-the-tin grease into them there parts for a super smooth ride. ________________________________________________________________________________ Max SportsKombi - The Bay Racer
@brazilianvwbay | |
|
| | |
MarcusH
Cabin : Exec 031
Location : Sheffield
Posts : 814
Join date : 2011-12-08
| | Subject: Re: It's stripping time! Mon Jan 07, 2013 5:39 pm | |
| Amazing work Skytiger - I wish I had the confidence and knowledge to work on my camper like that | |
|
| | |
Skytiger
Cabin : Exec 008
Location : Central Scotland
Posts : 1792
Join date : 2010-09-04
| | Subject: Re: It's stripping time! Tue Jan 08, 2013 2:17 pm | |
| Thanks MarcusH - you could do it aswell. I just have hours of cleaning all the old parts before reassembly now | |
|
| | |
Skytiger
Cabin : Exec 008
Location : Central Scotland
Posts : 1792
Join date : 2010-09-04
| | Subject: Re: It's stripping time! Sat Jan 12, 2013 9:15 pm | |
| Well cleaning started today, cleaned the trailing arms and around the beam on both sides today. I have decided to leave the beam in and paint in situ. I still have to clean up the inside of the trailing arms where the link pins go into. I'm just leaving all to dry before paint. A before pic 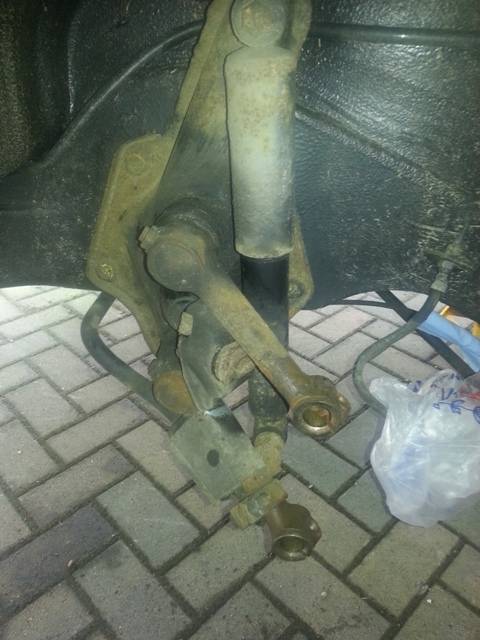 And after 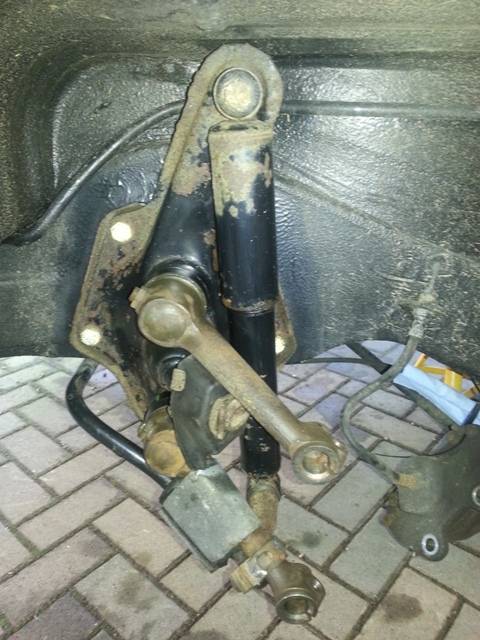 Still have all the little components to clean up probably tommorows task as the weather is to turn, a nice inside job with the heater on. | |
|
| | |
dazdub
Cabin : Exec 012
Location : wales
Posts : 3117
Join date : 2009-10-16
| | Subject: Re: It's stripping time! Sat Jan 12, 2013 10:44 pm | |
| Looking good keep up the good work | |
|
| | |
Skytiger
Cabin : Exec 008
Location : Central Scotland
Posts : 1792
Join date : 2010-09-04
| | Subject: Re: It's stripping time! Wed Feb 13, 2013 8:36 pm | |
| Sorry about no further updates, unfortunately one of my spindles was damaged in transit. Transporterhaus are replacing it so shouldn't be long before work continues. | |
|
| | |
dazdub
Cabin : Exec 012
Location : wales
Posts : 3117
Join date : 2009-10-16
| | Subject: Re: It's stripping time! Wed Feb 13, 2013 9:14 pm | |
| It's going to look coooooool
Last edited by dazdub on Mon Mar 11, 2013 7:18 am; edited 1 time in total | |
|
| | |
Skytiger
Cabin : Exec 008
Location : Central Scotland
Posts : 1792
Join date : 2010-09-04
| | Subject: Re: It's stripping time! Mon Feb 18, 2013 10:51 pm | |
| Some progress A picture with the beam and trailing arms sanded down will all loose rust removed ready for painting.  Here's one with it painted. 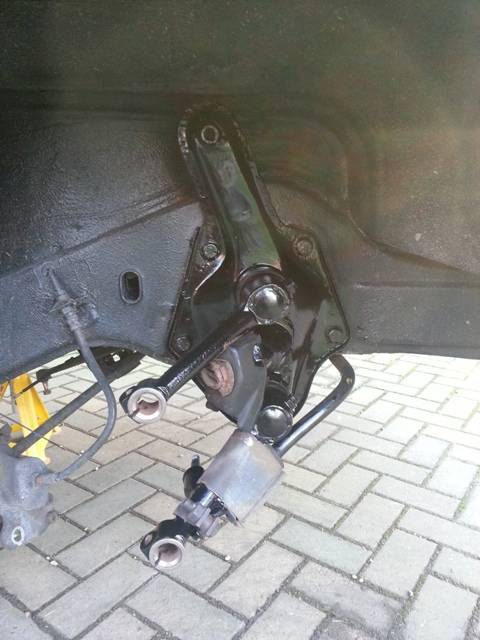 | |
|
| | |
Sponsored content
| | Subject: Re: It's stripping time! | |
| |
|
| | |
| | It's stripping time! | |
|